If you asked me 5 years ago what a JavaScript bundler is, I’d probably tell you it’s something people fight with for hours, just to get a simple web app set up 🤪 While this might have been closer to the truth in 2018, a lot has changed in JavaScript ecosystem until today.
If you’re starting your web development journey, or maybe have already dived into it, but are not really sure what JS bundlers are and what’s their role, you’re reading a proper piece of explanation 🙂
Chaos and complexity – the issues
Let’s consider a very simple JavaScript app. We have just one page index.html. Our HTML is hydrated with index.js file, which adds some interactivity to it. In order to use it, we need to import index.js script in index.html file. We also decided to use an external library (Bootstrap), so we should also link the necessary CSS.
We are linking the index.js with a script tag in head section:
Of course, as we are building a web application, we won’t put all the JavaScript code in index.js. That’s why we created two separate files with some functionalities: my-utils.js and navigation.js.
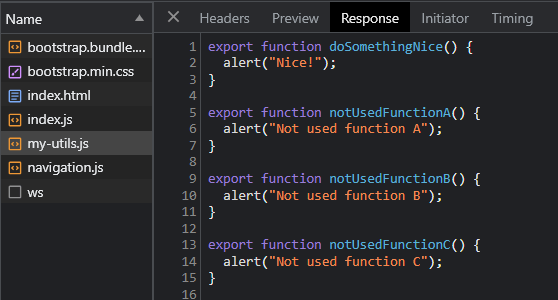
For instance, the my-utils.js exports a few functions:
Notice the not used functions there – we’ll get to the point of them soon.
Next, our index.js file imports what it needs and adds some interactivity to the HTML elements:
If we now open our webpage, we can see the network activity when the page is loaded:

Notice that all 3 JavaScript files are fetched separately: index.js, my-utils.js and navigation.js.
What’s more, if you check the contents of my-utils.js, it obviously loads the whole script, containing even the not used functions:
I think you might already feel that this can get a little problematic 😉 Imagine managing this when you have hundreds of your own JavaScript files plus dozens of external libraries. Not only will your app be making hundreds of network requests to fetch every single file, but it will always fetch everything – even the stuff your page doesn’t use.
Here’s where a JavaScript bundler comes into the field.
You can find full source code of this JavaScript app here.
What does a JavaScript bundler do?
JavaScript bundler produces bundles 🙂 But what is a bundle? It’s basically a static file, optimized to be served to the client (in our case: a web browser). The main goal is to produce a single bundle file from multiple dependencies. In effect, the user’s browser doesn’t need to fetch so many files separately. But how is such a bundle created?
First, a JavaScript bundler needs to know the entry point. It’s a kind of root in which our “code tree” begins. In the case of our sample JavaScript application from the previous paragraph, a perfect candidate for an entry point would be the index.js file. Modern bundlers support multiple entry points. It can be very useful if you’re building a multipage application, so each page can have its own entry point.
The next step is to create a dependency graph. The JavaScript bundler is basically starting from the root (entry point) and traverses all dependencies referenced from it, as well as all of these dependencies’ dependencies. Having the dependency graph, bundler knows what is exactly used by what and in which place of our app.
This is how you can imagine the graph of dependencies:

Module bundlers like webpack not only know the dependencies of your entry point. These tools even check what each dependency uses. Thanks to building such a detailed dependency graph, the bundler can introduce multiple optimizations into the bundle file.
Finally, JavaScript bundler outputs the actual bundles. As I mentioned, bundles can be highly optimized by applying techniques like code splitting, CSS inlining, HMR and various performance optimizations.
JavaScript bundler might also ensure the backwards-compatibility with older web browsers by converting some newer JavaScript constructs used in your code to their equivalents from previous JS versions.
What’s interesting, modern bundlers can handle not only JS files, but also CSS, HTML and even images.
JavaScript bundler in action
Currently, the most popular JavaScript bundles is (still) webpack. It has been the first really advanced bundler created for both the browser and NodeJS.
You might have heard unpleasant things about webpack and in fact, its configuration can get really spaghetti 🤪 There are simpler alternatives out there, but let’s start with what’s the most common tool used in web development today.
Adding webpack to a JavaScript app
Our sample app already has a package.json file (we used JavaScript modules), so we can install webpack with this command:
npm install --save-dev webpack webpack-cli
Now we should reorganize the files a bit. Let’s put all scripts in src folder and move index.html to dist folder. Finally, it looks like that:

Using the folder named dist is very common. It stands for distributable, which means the code ready to be distributed = served to the public. This is where our bundles will be located. As the index.html is directly served to the public, we also place it there.
With such a folders structure, there’s nothing more we need to configure for webpack to work. By default, webpack looks for src/index.js file which we already have and outputs bundles into the dist folder. To use more advanced features or multiple entry points, a configuration file should be added.
In our case, let’s go with the zero-config approach. The only thing we need is to add a script entry to package.json:
Let’s now run npm run build and see what happens:

It seems that webpack created the main.js asset (bundle):

Let’s make sure that our index.html page links this bundle file properly:
Now, let’s open our index.html page and see how the network requests look like now:
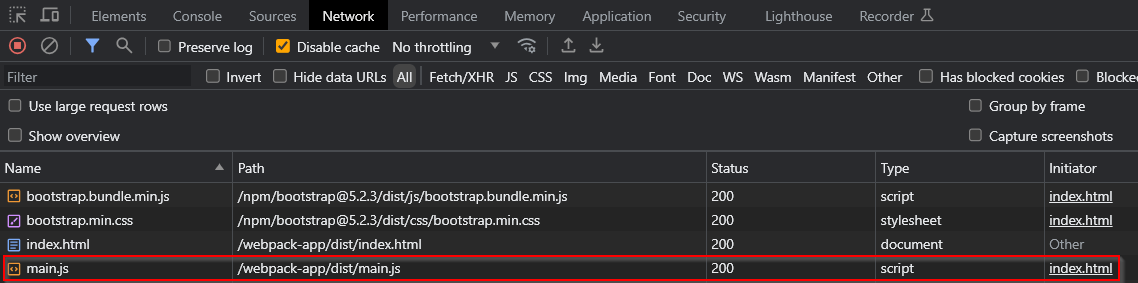
Wow, that’s something different from what we had previously! Notice that now only 1 script, the main.js file, is fetched by the webpage. There were 3 before: index.js, my-utils.js and navigation.js. Of course, the web page works exactly as before.
Let us also examine the contents of the fetched main.js file:

Pay attention what happened here. Webpack has nicely inlined all the external code we used directly into the main.js bundle. What’s more, the exported, but not used functions from my-utils.js are not present here at all! When building the dependency graph, webpack noticed that those functions are not used, so it didn’t include them😉
This is basically how webpack and most JavaScript bundlers work. Their role is to deliver the smallest and the most optimized bundles possible. This ultimately saves a lot of bandwidth by avoiding unnecessary network requests the client browser would otherwise need to make. Cutting out the unused code makes the bundles smaller, again reducing the network usage.
You can find full source code of the webpack app here.
Webpack has a lot more to offer
From all the JavaScript bundlers used today, webpack is the most advanced one. It’s the most mature one as well. It offers dozens of customizations, plugins and loaders. You can also easily add TypeScript support.
You can do really crazy stuff with webpack 😉 However, if you are starting your web development journey, don’t get overwhelmed by learning it all. Just be aware that webpack can do almost everything you might need. It’s just a matter of searching StackOverflow or asking Copilot 😉
Alternatives to webpack
In recent years, developers created a few other amazing JavaScript bundlers. I recommend you to pay attention to them, because webpack doesn’t have to be your first choice today. Webpack is still used in CRA, which is believed to be a default way of creating new React applications. This is what makes it very widely used, but you don’t need to follow this path 🙂
I recommend checking Parcel, esbuild and ViteJS. These are modern bundlers created to, among others, eliminate some of webpack’s burdens. If you’re starting out and don’t want to get yourself busy with bundling configuration, I especially recommend creating your next app with Parcel.
Summary
That’s all that you need to know about JavaScript bundlers to be able to work with them and understand what’s happening when executing this magic npm run build script 😉
If you’re a .NET developer, and you enjoyed this article, I think you may also find my free guide useful:


Thanks 🙏
No worries! 😌